After discussing on MLFlow in the last post, in today’s post, let’s have a look at Kubeflow
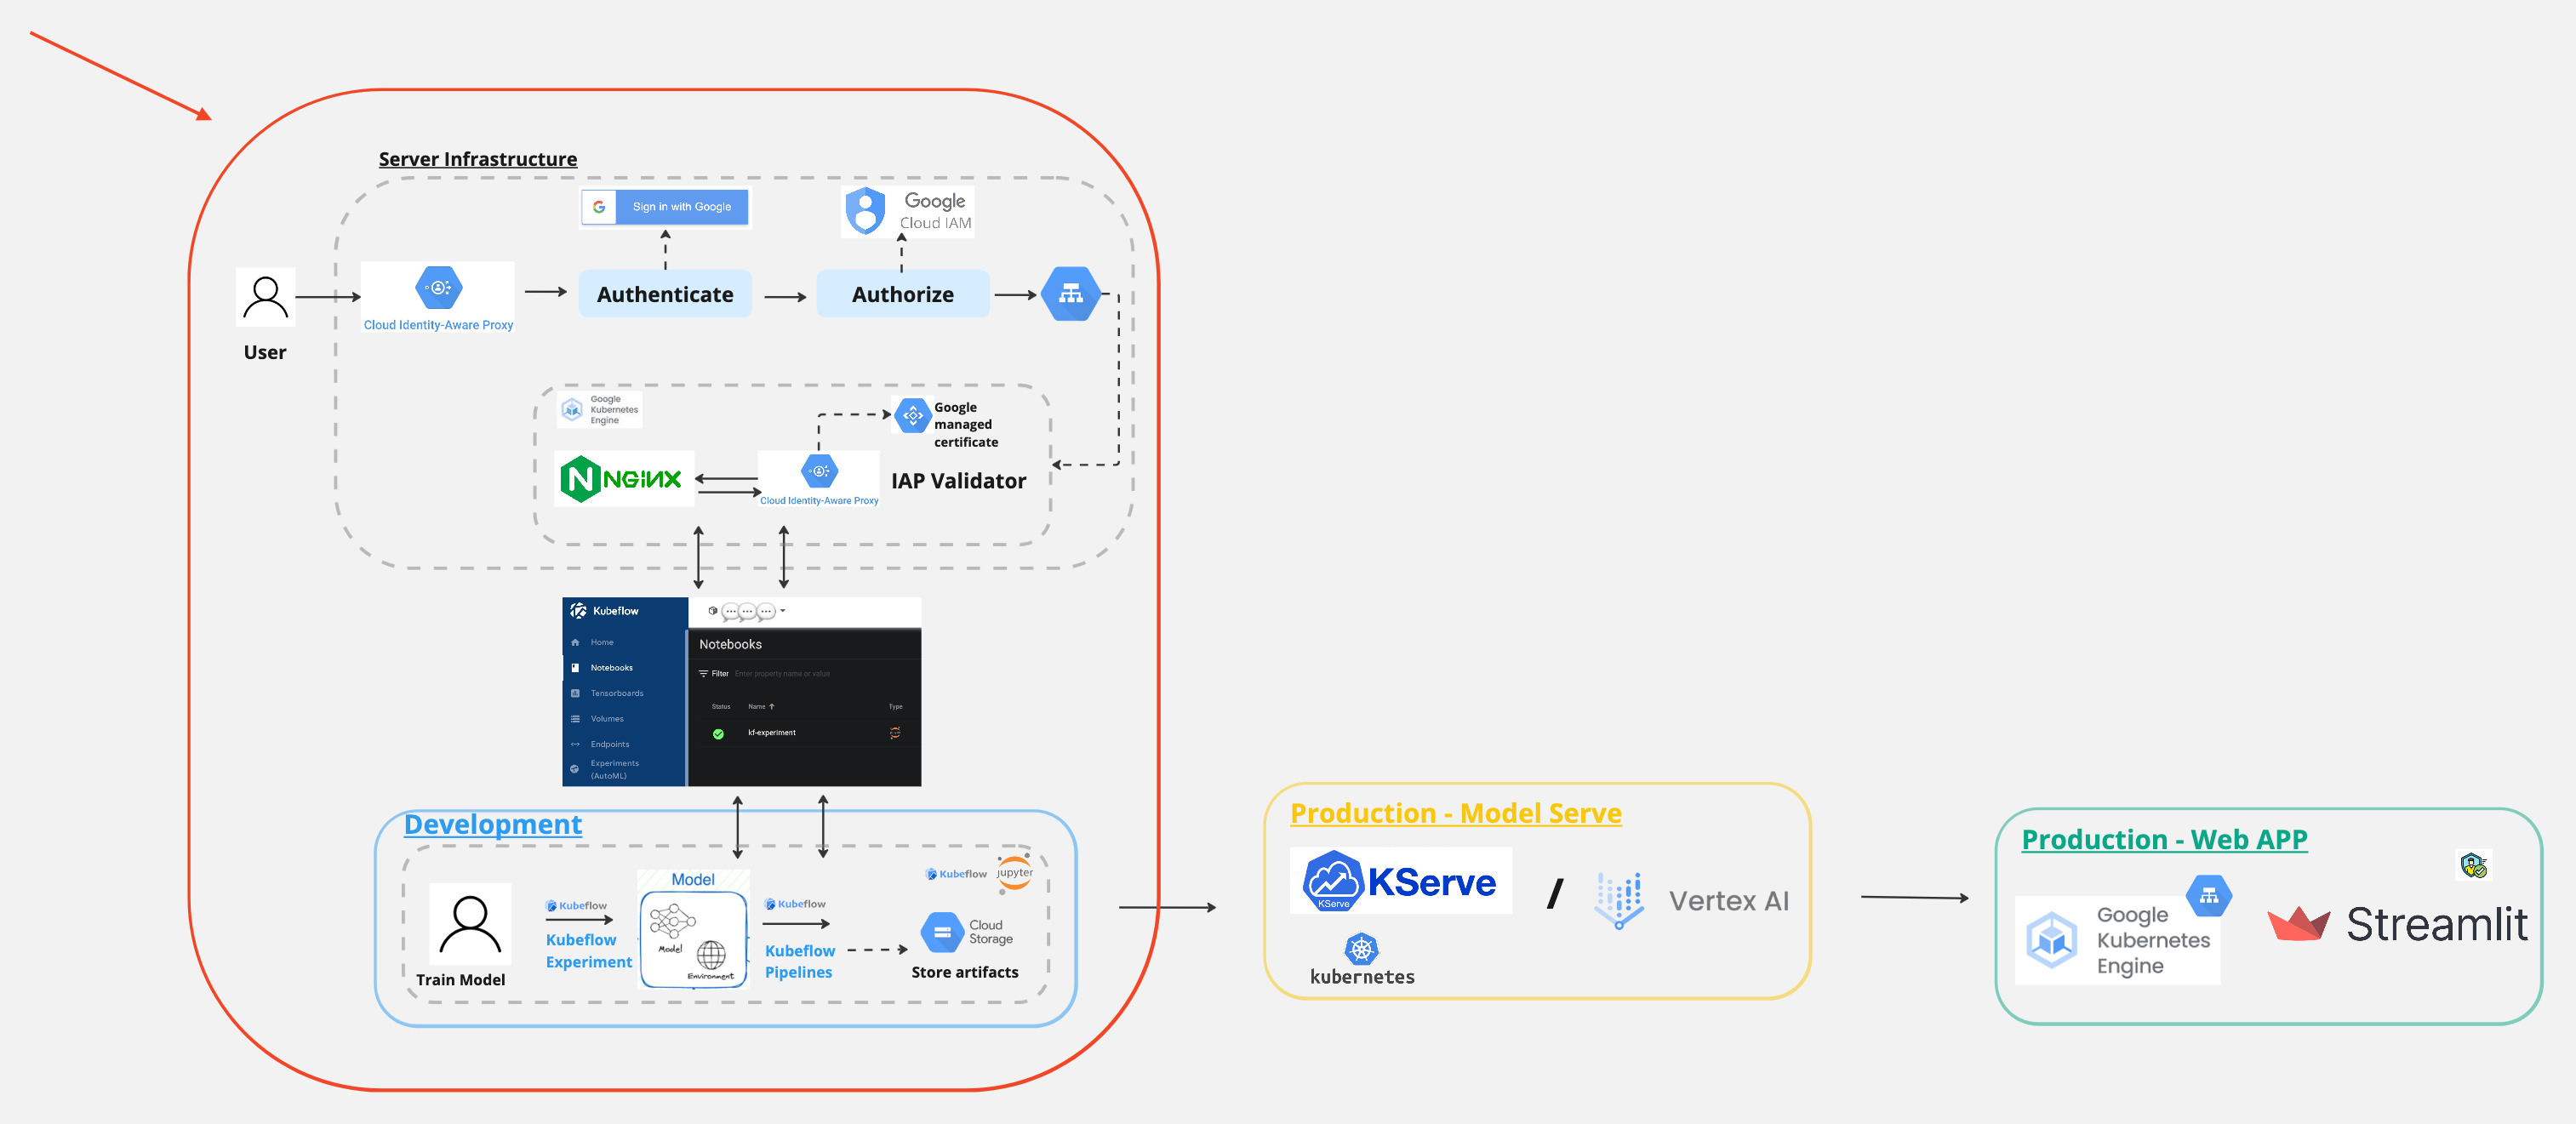
Architecture
Here is an overview of the MLOPS workflow with Kubeflow.
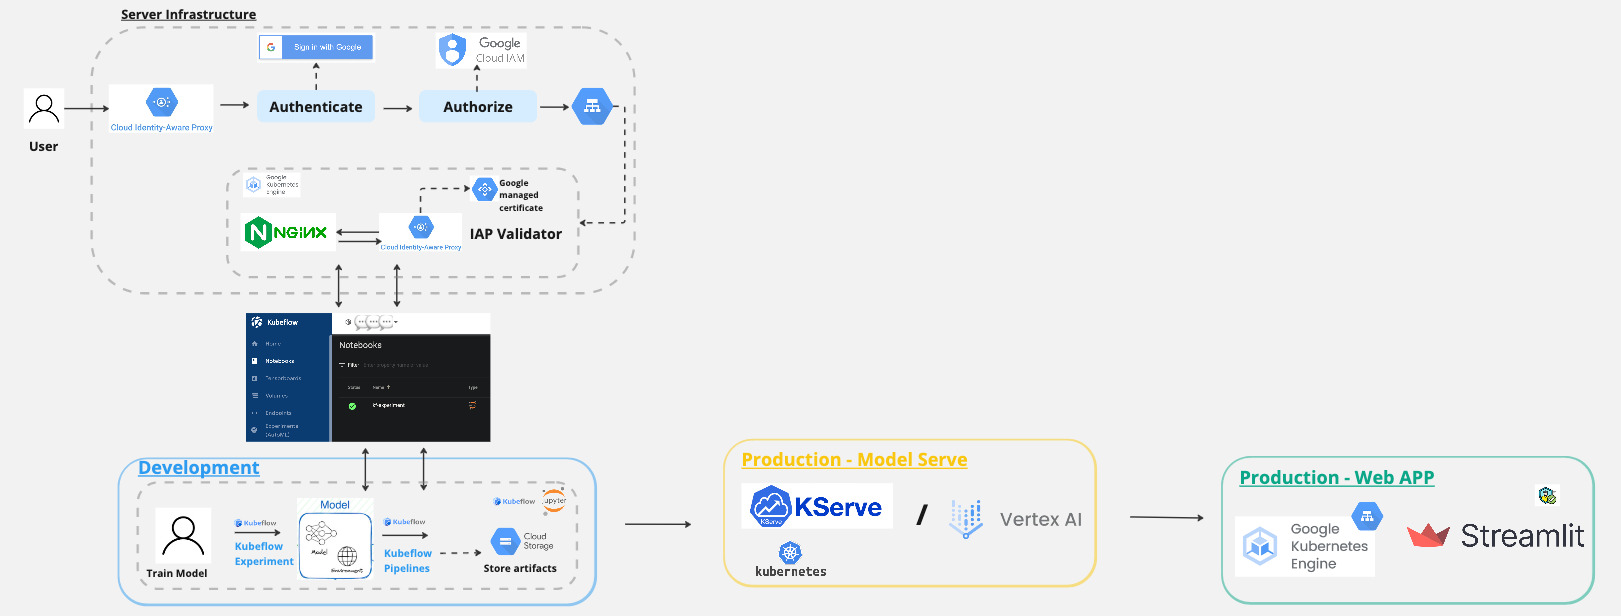
And in today’s post, we will focus on this part.
What is Kubeflow?
Kubeflow is an open-source machine learning (ML) toolkit for Kubernetes. It is dedicated to making deployments of machine learning workflows on Kubernetes simple, portable, and scalable. Kubeflow can facilitate the orchestration of Kubernetes ML workloads and to empower users to deploy best-in-class open-source tools on any Cloud infrastructure.
Deploying Kubeflow on GCP
Account Set up
gcloud config set project <PROJECT-ID>
Open cloud console
gcloud services enable \
  serviceusage.googleapis.com \
  compute.googleapis.com \
  container.googleapis.com \
  iam.googleapis.com \
  servicemanagement.googleapis.com \
  cloudresourcemanager.googleapis.com \
  ml.googleapis.com \
  iap.googleapis.com \
  sqladmin.googleapis.com \
  meshconfig.googleapis.com \
  krmapihosting.googleapis.com \
  servicecontrol.googleapis.com \
  endpoints.googleapis.com \
  cloudbuild.googleapis.com
And then execute the below commands in GCP’s cloud shell
gcloud beta container clusters create tmp-cluster \
  --release-channel regular \
  --workload-pool=${PROJECT_ID}.svc.id.goog \
  --region us-central1


gcloud beta container clusters delete tmp-cluster \
  --region us-central1
curl --request POST \
  --header "Authorization: Bearer $(gcloud auth print-access-token)" \
  --data '' \
  https://meshconfig.googleapis.com/v1alpha1/projects/${PROJECT_ID}:initialize
Setting up OAuth client
-
Navigate to https://console.cloud.google.com/apis/credentials/consent
-
Edit Application:
Authorised domain:
<project-id>.cloud.goog
- On the credentials screen:
- Click Create credentials, and then click OAuth client ID.
- Under Application type, select Web application.
- In the Name box enter any name for your OAuth client ID. This is not the name of your application nor the name of your Kubeflow deployment. It’s just a way to help you identify the OAuth client ID.
The Client ID and Client Secret are generated.
<client-id>.googleusercontent.com
In the Authorized redirect URIs box, enter the following (if it’s not already present in the list of authorized redirect URIs):
https://iap.googleapis.com/v1/oauth/clientIds/<client-id>.apps.googleusercontent.com:handleRedirect
Deploying Management cluster
- On cloud console
gcloud components install kubectl kustomize kpt anthoscli beta
gcloud components update
# If the output said the Cloud SDK component manager is disabled for installation, copy the command from output and run it.
- Clone github repo
Note that, on the official kubeflow documentation, it mentioned that the repo needs to be clone again when deploy the kubeflow cluster, however, it is not necessary to clone the repo again.
Also, it maybe easier to run the below command in your local terminal instead of cloud shell. Since I found that the cloud shell is likely to lost connection while creating the cluster, since it takes a bit of time to create.
git clone https://github.com/googlecloudplatform/kubeflow-distribution.git
cd kubeflow-distribution
git checkout master
Go to kubeflow-distribution/management directory for Management cluster configurations.
cd management
Configure Environment Variables
Fill in environment variables in
kubeflow-distribution/management/env.sh
Run the followings:
nano env.sh
MGMT_PROJECT=<the project where you deploy your management cluster>
MGMT_NAME=<name of your management cluster>
LOCATION=<location of your management cluster, use either us-central1 or us-east1>
source env.sh
Configure kpt setter values
Use kpt to set values for the name, project, and location of your management cluster. Run the following command:
bash kpt-set.sh
Enable the Anthos API if it is not already enabled:
gcloud services enable anthos.googleapis.com --project=${PROJECT_ID}
kpt fn eval -i list-setters:v0.1 ./manifests
Deploy Management Cluster
- Deploy the management cluster by applying cluster resources:
make create-cluster
- Create a kubectl context for the management cluster, it will be named
${MGMT_NAME}:
make create-context
- Grant permission to Config Controller service account:
make grant-owner-permission
Deploying Kubeflow cluster
- Run the following command to pull upstream manifests from
kubeflow/manifestsrepository.
cd kubeflow

bash ./pull-upstream.sh
Environment Variables
Log in to gcloud. You only need to run this command once:
gcloud auth login
- Review and fill all the environment variables in
kubeflow-distribution/kubeflow/env.sh, they will be used bykptlater on, and some of them will be used in this deployment guide.
Review the comment in env.sh for the explanation for each environment variable.
nano env.sh
After defining these environment variables, run:
source env.sh
export CLIENT_ID=<client-id>
export CLIENT_SECRET=<client-secret>
export MGMT_PROJECT=<project-id>
export MGMT_NAME=<name-of-management-cluster-on-gke>
kpt setter config
Run the following commands to configure kpt setter for your Kubeflow cluster:
bash ./kpt-set.sh
Everytime you change environment variables, make sure you run the command above to apply kpt setter change to all packages. Otherwise, kustomize build will not be able to pick up new changes.
Note, you can find out which setters exist in a package and their current values by running the following commands:
kpt fn eval -i list-setters:v0.1 ./apps
kpt fn eval -i list-setters:v0.1 ./common
You can learn more about list-setters in kpt documentation.
Authorize Cloud Config Connector for each Kubeflow project
- Set the Management environment variable if you haven’t:
Apply ConfigConnectorContext for ${KF_PROJECT} in management cluster:
make apply-kcc
Configure Kubeflow
Make sure you are using KF_PROJECT in the gcloud CLI tool:
gcloud config set project ${KF_PROJECT}
Deploy Kubeflow
To deploy Kubeflow, run the following command:
make apply
kubectl -n kubeflow get all
Access the Kubeflow user interface (UI)
To access the Kubeflow central dashboard, follow these steps:
Use the following command to grant yourself the IAP-secured Web App User role:
gcloud projects add-iam-policy-binding "${KF_PROJECT}" --member=user:user@email.com --role=roles/iap.httpsResourceAccessor
Enter the following URI into your browser address bar. It can take 20 minutes for the URI to become available: https://${KF_NAME}.endpoints.${KF_PROJECT}.cloud.goog/
kubectl -n istio-system get ingress
export HOST=$(kubectl -n istio-system get ingress envoy-ingress -o=jsonpath={.spec.rules[0].host})
Kubeflow dashboard is now available at the following URL: https://${KF_NAME}.endpoints.${KF_PROJECT}.cloud.goog/
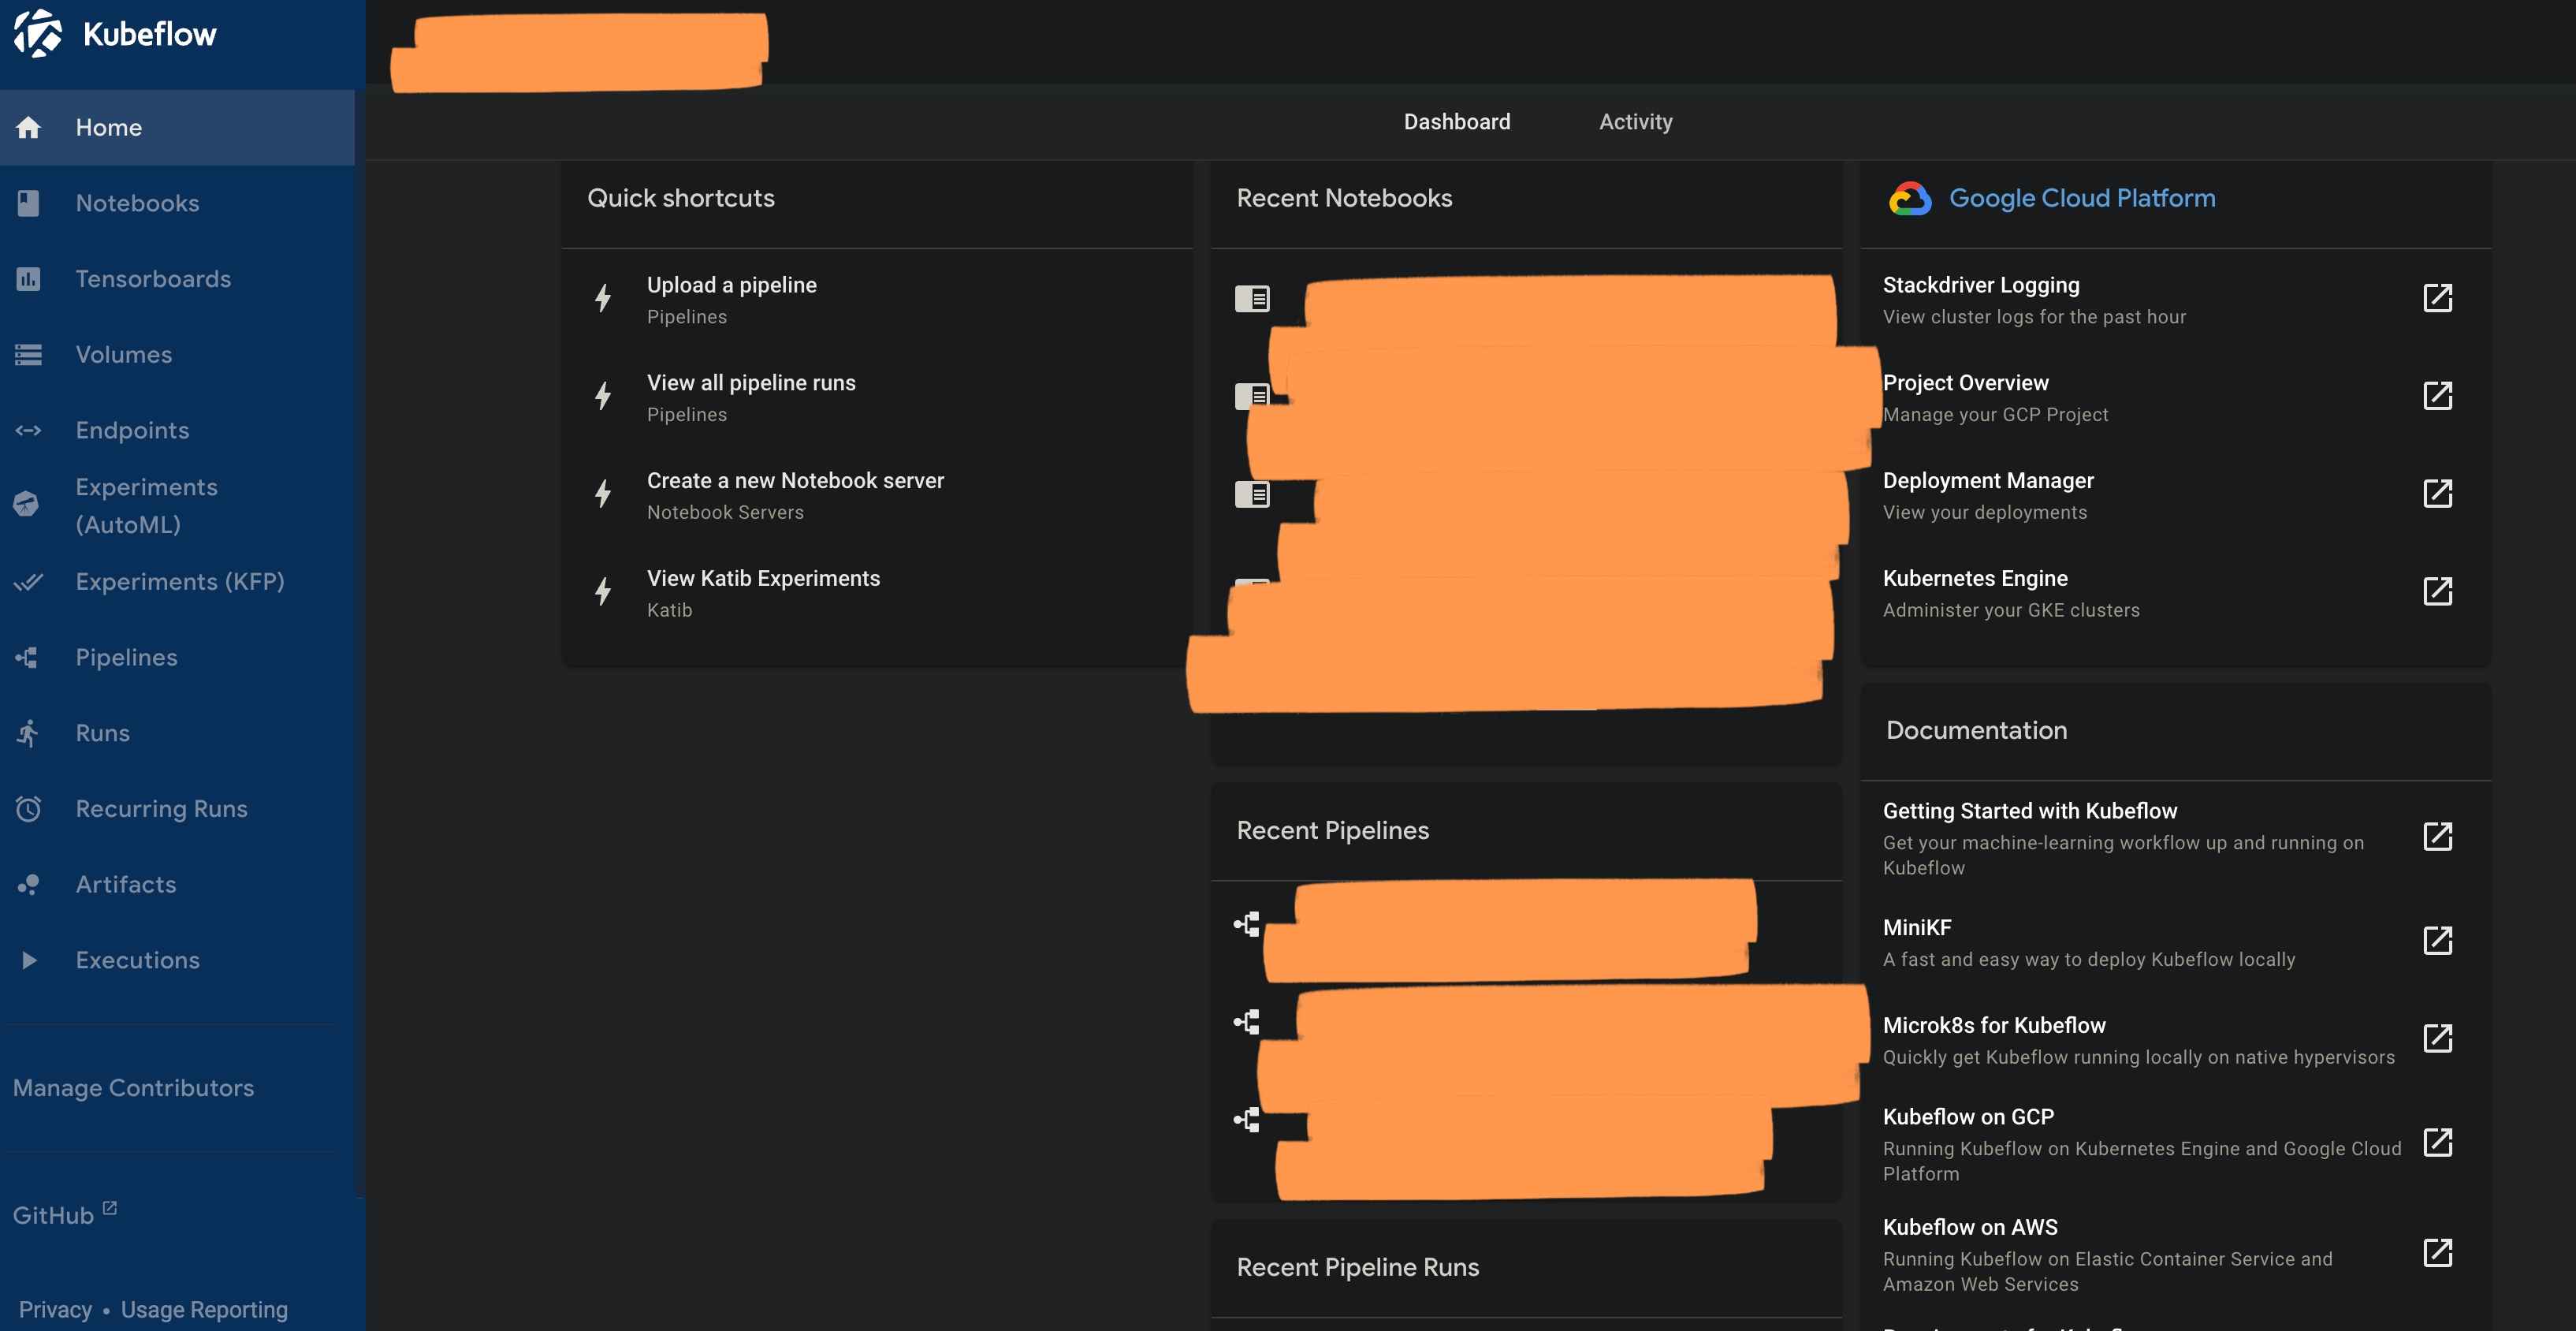
Setting up Kubeflow
Now we have set up both the management and kubeflow cluster, we can start exploring and using the kubeflow dashboard.
Set up Notebook instance

GitHub Connection
To integrate with GitHub, you need to create a GitHub token and we will use it when cloning the repo in the notebook instance.
First we will need to install the pexpect package in the notebook instance.
! pip install pexpect==4.9.0
Now we are all set, we can start building ML pipelines with Kubeflow!
Building ML Pipelines with Kubeflow
When working with notebooks in Kubeflow, you can use the Kubeflow Pipelines SDK to create reusable components and pipelines. The SDK allows you to define a pipeline using Python code, which can be executed in a Jupyter notebook or a Python script. The SDK provides a set of high-level abstractions that make it easy to define and run pipelines in Kubeflow.
In this section, we will walk through the process of building a machine learning pipeline using the Kubeflow Pipelines SDK. We will start by building the pipelines on Vertex AI and then move on to deploy the pipelines on Kubeflow.
Building Vertex AI ML Pipelines with Kubeflow
To begin using the Kubeflow Pipelines SDK, you need to install the most recent version of protobuf then install the version 3.20.x
! pip install protobuf --upgrade
! pip install protobuf==3.20.1
# Import library

import kfp
from kfp import dsl
from kfp.dsl import (Output,Metrics,component)
from kfp import compiler
# Define the pipeline for training a machine learning model

@component(
packages_to_install=["google-cloud-aiplatform","gcsfs","xgboost","category_encoders","imbalanced-learn==0.11.0","pandas","google-cloud-storage"]
)
def custom_training_job_component(
    max_depth:int,
    learning_rate:float,
    n_estimators:int,
    metrics: Output[Metrics]
)->NamedTuple("output", [("model_validation", str)]):

    import pandas as pd
    from sklearn.metrics import precision_score, recall_score, roc_auc_score, accuracy_score
    from sklearn.model_selection import train_test_split
    from category_encoders import HashingEncoder
    from imblearn.over_sampling import SMOTE
    from xgboost import XGBClassifier
    from google.cloud import storage

    storage_client = storage.Client()
    bucket = storage_client.bucket("gcp-bucket-kubeflow")

    def load_data(file_path):
        df = pd.read_csv(file_path)
        return df

    def preprocess_data(df):

        df = df.drop(columns=['car', 'toCoupon_GEQ5min', 'direction_opp'])
        df = df.fillna(df.mode().iloc[0])
        df = df.drop_duplicates()

        df_dummy = df.copy()
        age_list = []
        for i in df['age']:
            if i == 'below21':
                age = '<21'
            elif i in ['21', '26']:
                age = '21-30'
            elif i in ['31', '36']:
                age = '31-40'
            elif i in ['41', '46']:
                age = '41-50'
            else:
                age = '>50'
            age_list.append(age)
        df_dummy['age'] = age_list

        df_dummy['passanger_destination'] = df_dummy['passanger'].astype(str) + '-' + df_dummy['destination'].astype(str)
        df_dummy['marital_hasChildren'] = df_dummy['maritalStatus'].astype(str) + '-' + df_dummy['has_children'].astype(str)
        df_dummy['temperature_weather'] = df_dummy['temperature'].astype(str) + '-' + df_dummy['weather'].astype(str)
        df_dummy = df_dummy.drop(columns=['passanger', 'destination', 'maritalStatus', 'has_children', 'temperature','weather', 'Y'])

        df_dummy = pd.concat([df_dummy, df['Y']], axis = 1)
        df_dummy = df_dummy.drop(columns=['gender', 'RestaurantLessThan20'])
        df_le = df_dummy.replace({
            'expiration':{'2h': 0, '1d' : 1},
            'age':{'<21': 0, '21-30': 1, '31-40': 2, '41-50': 3, '>50': 4},
            'education':{'Some High School': 0, 'High School Graduate': 1, 'Some college - no degree': 2,
                         'Associates degree': 3, 'Bachelors degree': 4, 'Graduate degree (Masters or Doctorate)': 5},
            'Bar':{'never': 0, 'less1': 1, '1~3': 2, '4~8': 3, 'gt8': 4},
            'CoffeeHouse':{'never': 0, 'less1': 1, '1~3': 2, '4~8': 3, 'gt8': 4},
            'CarryAway':{'never': 0, 'less1': 1, '1~3': 2, '4~8': 3, 'gt8': 4},
            'Restaurant20To50':{'never': 0, 'less1': 1, '1~3': 2, '4~8': 3, 'gt8': 4},
            'income':{'Less than $12500':0, '$12500 - $24999':1, '$25000 - $37499':2, '$37500 - $49999':3,
                      '$50000 - $62499':4, '$62500 - $74999':5, '$75000 - $87499':6, '$87500 - $99999':7,
                      '$100000 or More':8},
            'time':{'7AM':0, '10AM':1, '2PM':2, '6PM':3, '10PM':4}
        })

        x = df_le.drop('Y', axis=1)
        y = df_le.Y

        return x, y

    def train_model(x_train, y_train,max_depth,learning_rate,n_estimators):

        model = XGBClassifier(
            max_depth=max_depth,
            learning_rate=learning_rate,
            n_estimators=n_estimators,
            random_state=42,
            use_label_encoder=False
        )
        model.fit(x_train, y_train)
        return model

    def evaluate_model(model, x_test, y_test, x_sm_train_hashing, y_sm_train):
        y_pred = model.predict(x_test)
        y_pred_proba = model.predict_proba(x_test)
        y_pred_train = model.predict(x_sm_train_hashing)
        y_pred_train_proba = model.predict_proba(x_sm_train_hashing)

        accuracy = accuracy_score(y_test, y_pred)
        precision = precision_score(y_test, y_pred)
        recall = recall_score(y_test, y_pred)


        return accuracy,precision,recall

    def encode_features(x, n_components=27):
        hashing_ros_enc = HashingEncoder(cols=['passanger_destination', 'marital_hasChildren', 'occupation', 'coupon',
                                               'temperature_weather'], n_components=n_components).fit(x)
        x_test_hashing = hashing_ros_enc.transform(x.reset_index(drop=True))
        return x_test_hashing

    def oversample_data(x_train_hashing, y_train):
        sm = SMOTE(random_state=42)
        x_sm_train_hashing, y_sm_train = sm.fit_resample(x_train_hashing, y_train)
        return x_sm_train_hashing, y_sm_train

    def save_model_artifact(pipeline):
        artifact_name = 'model.bst'
        pipeline.save_model(artifact_name)
        model_artifact = bucket.blob('coupon-recommendation/artifacts/'+artifact_name)
        model_artifact.upload_from_filename(artifact_name)

    df = load_data("./in-vehicle-coupon-recommendation.csv")

    x, y = preprocess_data(df)

    x_train, x_test, y_train, y_test = train_test_split(x, y, test_size=0.3, random_state=42)

    x_train.fillna(x_train.mode().iloc[0], inplace=True)
    x_test.fillna(x_train.mode().iloc[0], inplace=True)

    model_name = 'xgboost'
    x_train_hashing = encode_features(x_train)
    x_test_hashing = encode_features(x_test)
    x_sm_train_hashing, y_sm_train = oversample_data(x_train_hashing,y_train)

    pipeline = train_model(x_sm_train_hashing,y_sm_train,max_depth,learning_rate,n_estimators)

    accuracy,precision,recall = evaluate_model(pipeline,x_test_hashing,y_test,x_sm_train_hashing,y_sm_train)
    metrics.log_metric("accurancy", accuracy)
    metrics.log_metric("precision", precision)
    metrics.log_metric("recall", recall)

    model_validation = "true"
    if accuracy>0.5 and precision>0.5 and recall>0.5 :
        save_model_artifact(pipeline)
        model_validation="true"
    else :
        model_validation="false"

    return (model_validation,)
@dsl.pipeline(
    pipeline_root="gs://gcp-bucket-kubeflow/ml-pipeline-v1",
    name="ml-model-training-pipeline",
)
def pipeline(
    project: str = "kubeflow-mlops",
    region: str = "us-central1"
    ):

    max_depth=5
    learning_rate=0.2
    n_estimators=40

    model_training = custom_training_job_component(
        max_depth=max_depth,
        learning_rate=learning_rate,
        n_estimators=n_estimators,
    ).after(input_validation_task)
compiler.Compiler().compile(pipeline_func=pipeline,package_path='ml-pipeline.json')
start_pipeline = pipeline_jobs.PipelineJob(
    display_name="simple-kubeflow-pipeline",
    template_path="coupon-pipeline.json",
    enable_caching=False,
    location="us-central1",
)

start_pipeline.run()
Building kubeflow ML Pipelines with Kubeflow
Now, since we already have a running kubeflow pipeline, to deploy it to the kubeflow cluster, we can use the following command:
pipeline_file_path = 'ml-pipeline.yaml'
pipeline_name = 'ml-model-training-pipeline'

compiler.Compiler().compile(pipeline_func=pipeline,package_path=pipeline_file_path)

client = kfp.Client()
pipeline = client.pipeline_uploads.upload_pipeline(
                        pipeline_file_path, name=pipeline_name, description="Kubeflow ML pipeline")
After the execution of the above command, you can see the pipeline appear on the kubeflow UI under the Pipelines tab.
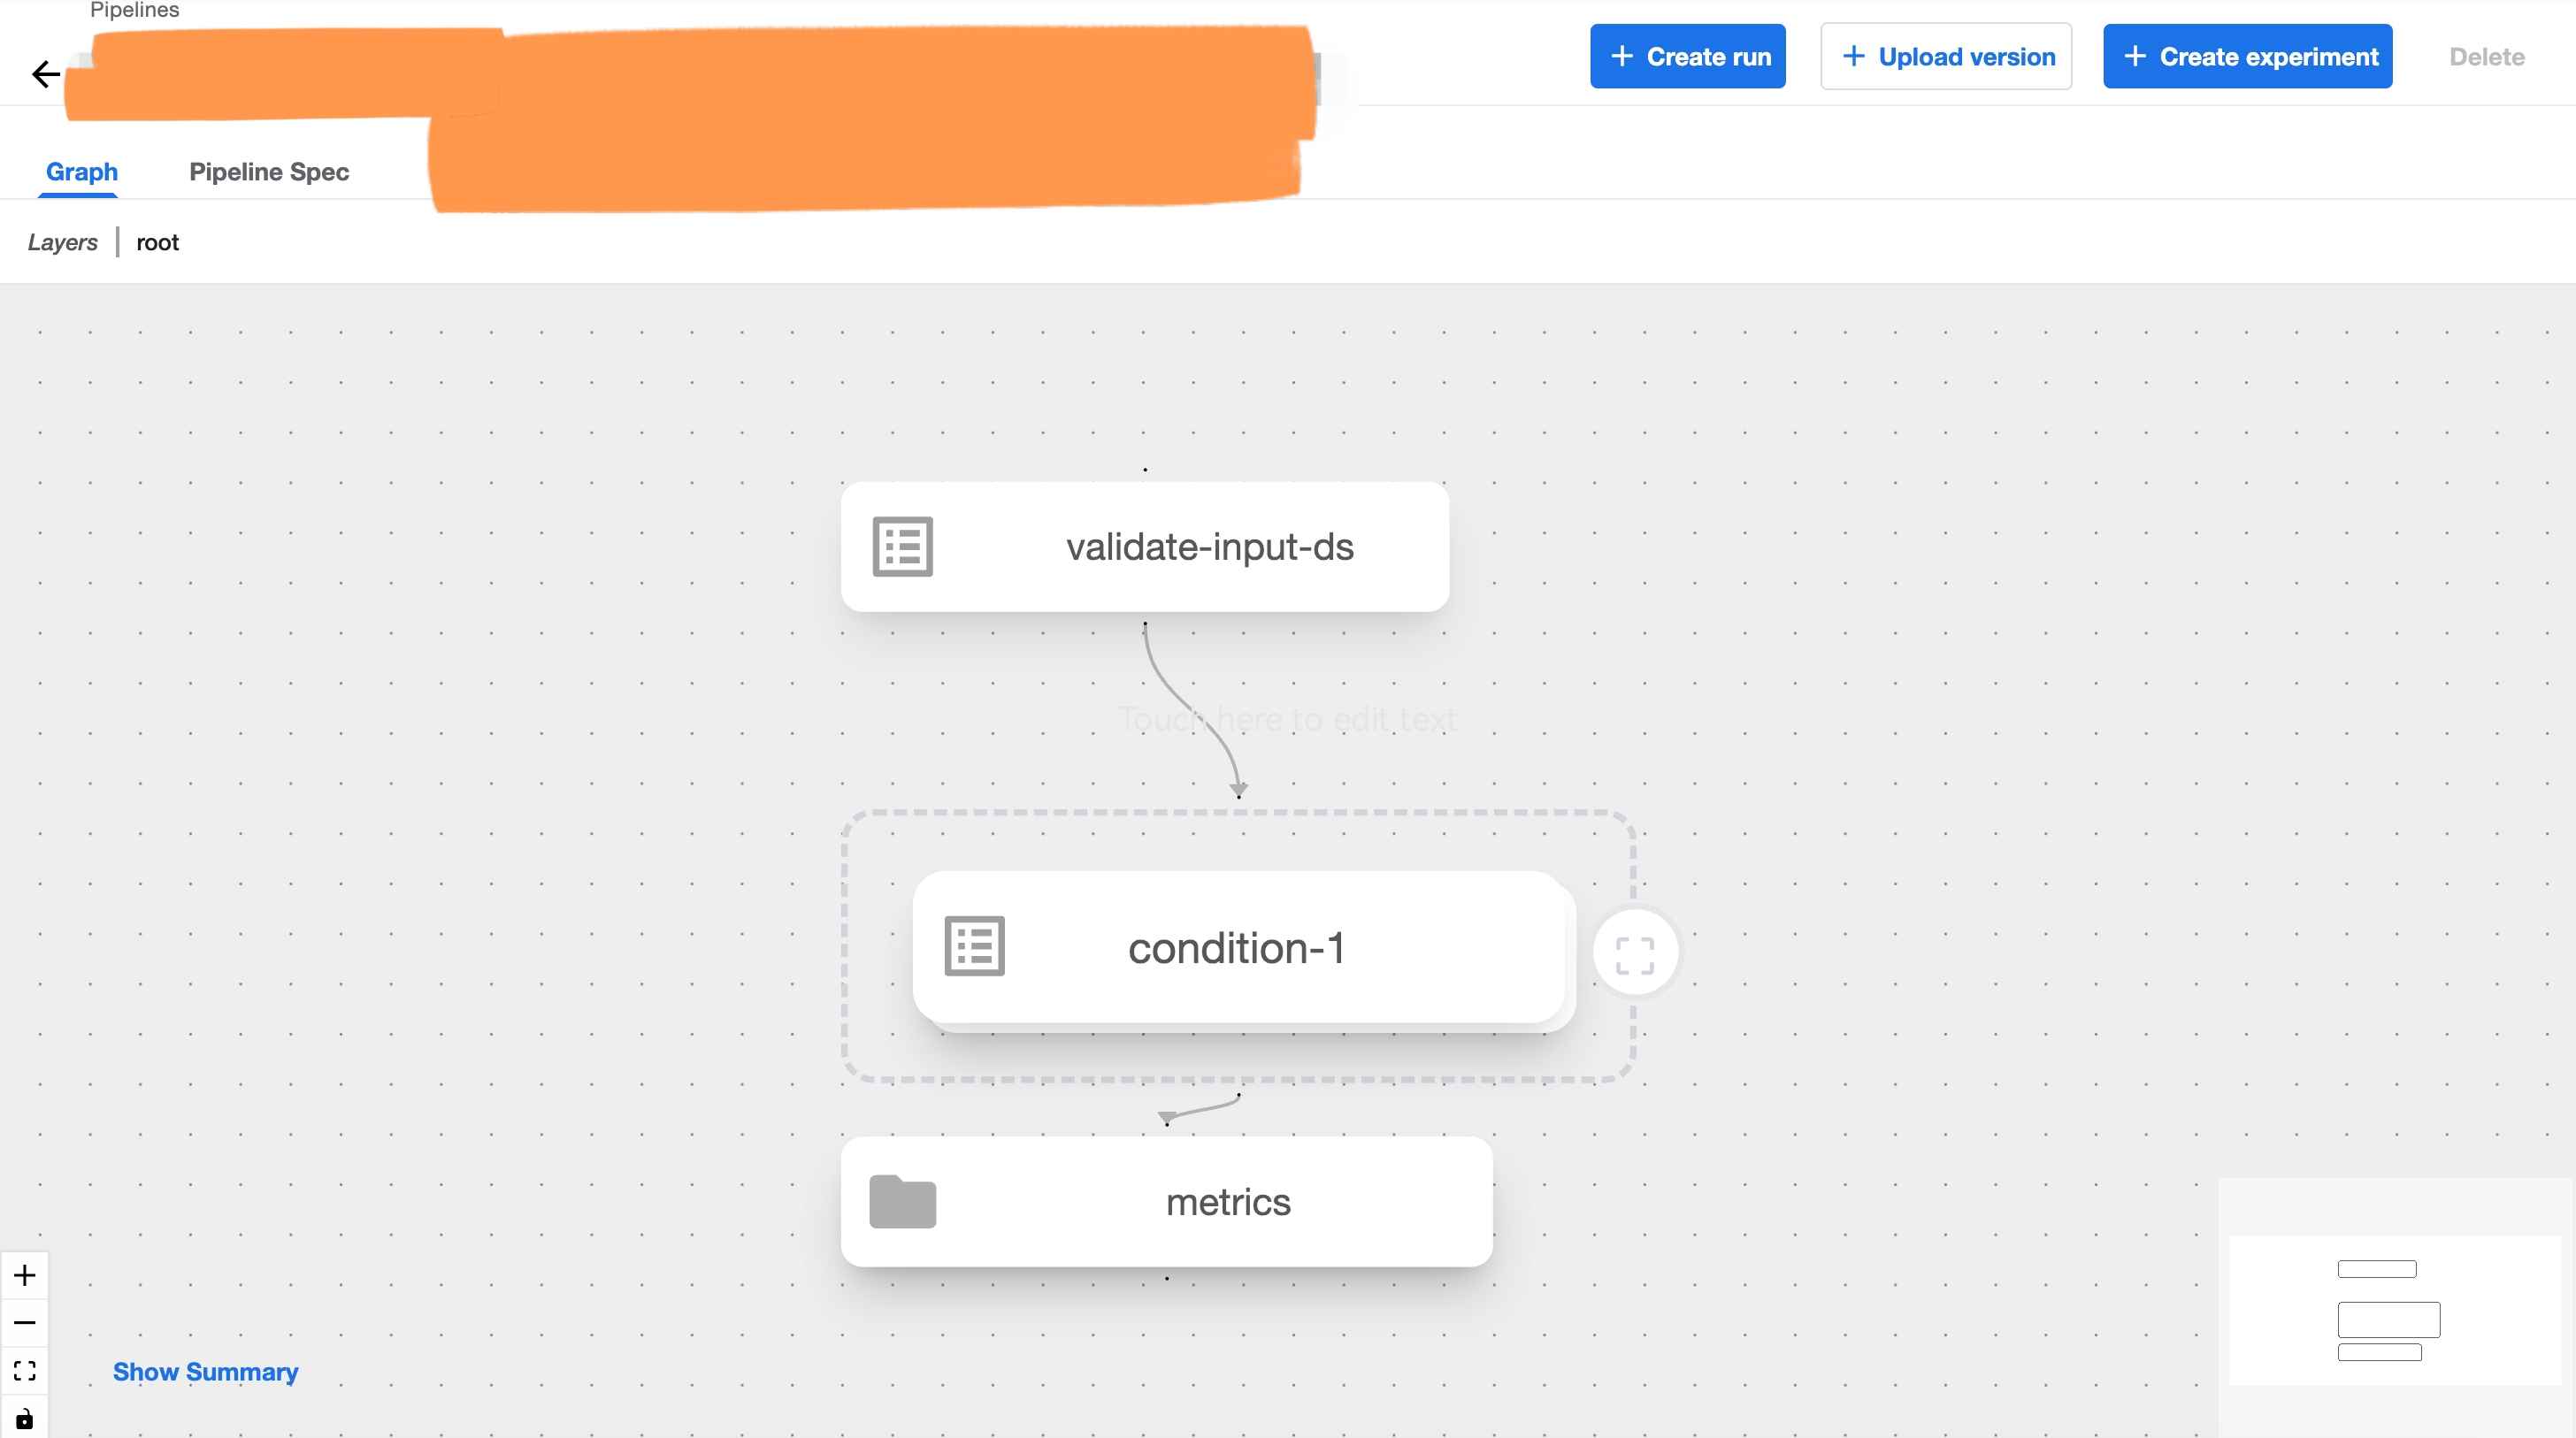
Once you have a running pipeline, on the kubeflow UI, we can also Create Experiment and Create Runs etc. as well.
Deploying ML Endpoints with Kubeflow
Similar to building ML pipelines, you can deploy ML endpoints, both Vertex AI model registry and kubeflow endpoint with Kubeflow SDK.
In this section, we will walk through the process of deploying ML endpoints on Vertex AI and Kubeflow.
Deploying Vertex AI endpoints with kubeflow for predictions
import kfp
from kfp.v2 import dsl
from kfp.v2.dsl import (Input,Output,Metrics,component,Model)
from kfp.v2 import compiler

from typing import NamedTuple

from google.cloud.aiplatform import pipeline_jobs
@component(
    packages_to_install=["google-cloud-aiplatform"]
)
def model_deployment()-> NamedTuple("endpoint", [("endpoint", str)]):

    from google.cloud import aiplatform

    aiplatform.init(project="gcp-prj-id-123", location="us-central1", staging_bucket="gs://gcp-bucket-kubeflow")

    model = aiplatform.Model.upload(
        display_name="coupon-recommendation-model",
        artifact_uri="gs://gcp-bucket-kubeflow/ml-model/artifacts/",
        serving_container_image_uri = "us-docker.pkg.dev/vertex-ai/prediction/xgboost-cpu.1-6:latest",
        sync=False
    )

    DEPLOYED_NAME = "coupon-model-endpoint"
    TRAFFIC_SPLIT = {"0": 100}
    MIN_NODES = 1
    MAX_NODES = 1

    endpoint = model.deploy(
        deployed_model_display_name=DEPLOYED_NAME,
        traffic_split=TRAFFIC_SPLIT,
        machine_type="n1-standard-4",
        min_replica_count=MIN_NODES,
        max_replica_count=MAX_NODES
    )
@dsl.pipeline(
    pipeline_root="gs://gcp-bcuket-kubeflow/ml-pipeline-v1",
    name="ml-model-training-ep-deplyment-pipeline",
)
def pipeline(
    project: str = "kubeflow-mlops",
    region: str = "us-central1"
    ):

    max_depth=5
    learning_rate=0.2
    n_estimators=40

    input_validation_task = validate_input_ds()


    model_training = custom_training_job_component(
        max_depth=max_depth,
        learning_rate=learning_rate,
        n_estimators=n_estimators,
    ).after(input_validation_task)

    with dsl.Condition(model_training.outputs["model_validation"] == "true"):
        task_deploy_model = model_deployment().after(model_training)
compiler.Compiler().compile(pipeline_func=pipeline,package_path='ml-pipeline-ep-deploy.json')

start_pipeline = pipeline_jobs.PipelineJob(
    display_name="ml-model-ep-deployment-pipeline",
    template_path="ml-pipeline-ep-deploy.json",
    enable_caching=False,
    location="us-central1",
)

start_pipeline.run()
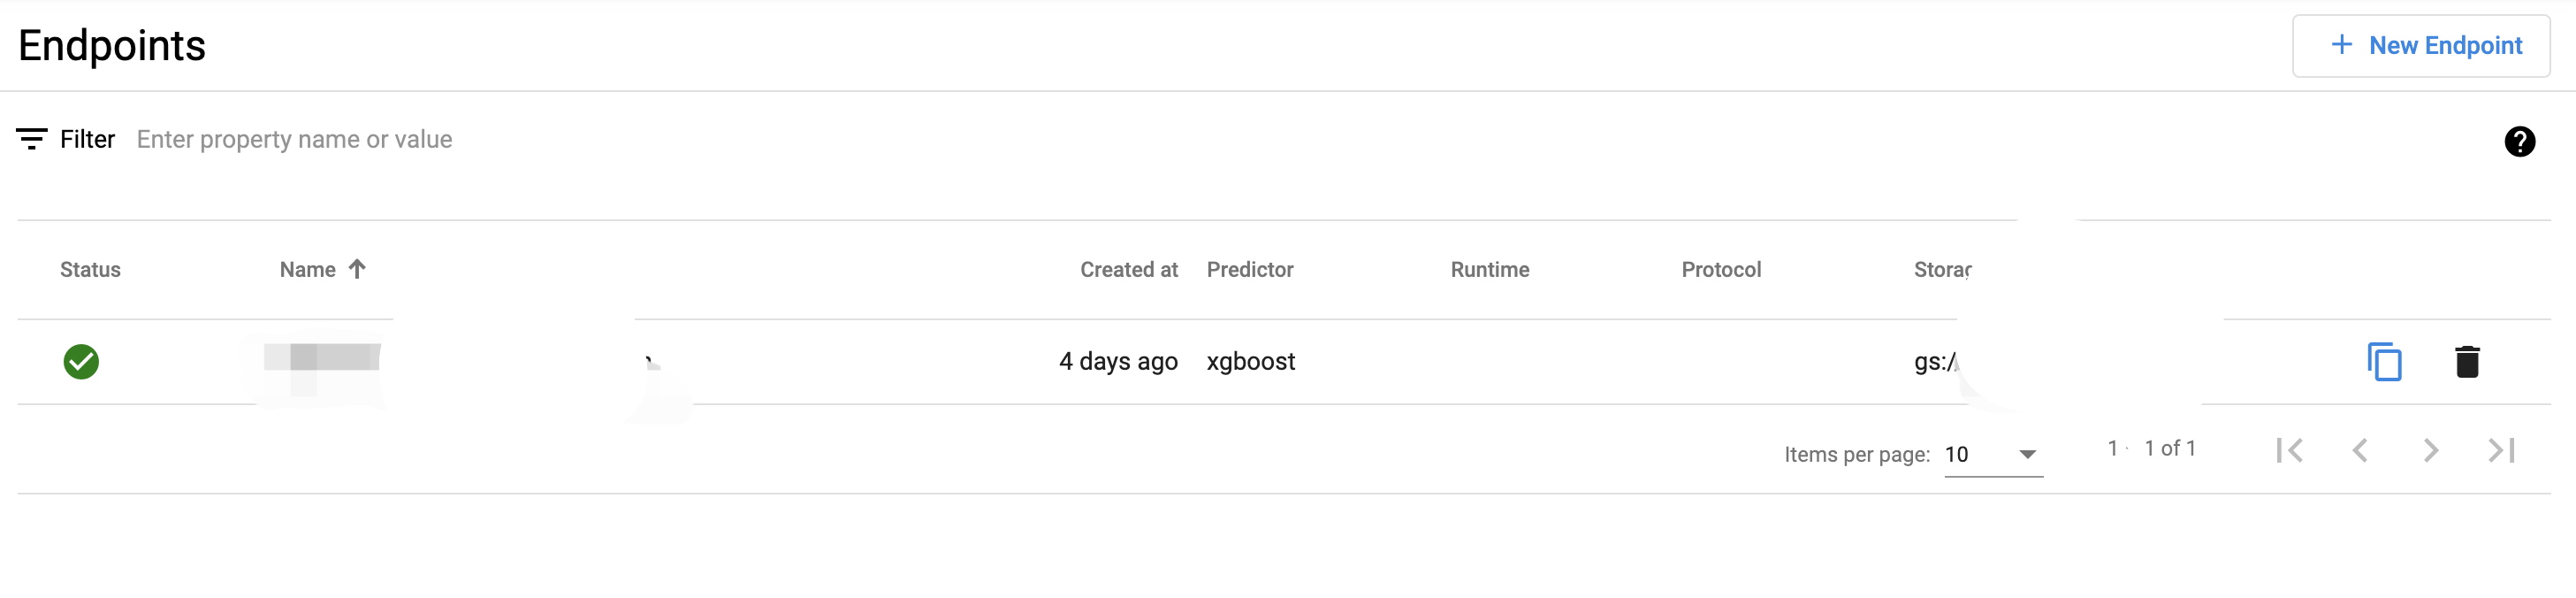
After the above command executed successfully, you can see the endpoint deployed on Vertex AI on the Vertex AI UI under Online Predictions > Endpoints
Deploying Kubeflow endpoints with Kubeflow for predictions
# Import the necessary libraries

from kubernetes import client
from kserve import KServeClient
from kserve import constants
from kserve import utils
from kserve import V1beta1InferenceService
from kserve import V1beta1InferenceServiceSpec
from kserve import V1beta1PredictorSpec
from kserve import V1beta1XGBoostSpec
namespace = utils.get_default_target_namespace()
name = 'xgboost-ml-model'
kserve_version = 'v1beta1'
api_version = constants.KSERVE_GROUP + '/' + kserve_version
# Define InferenceService
isvc = V1beta1InferenceService(api_version=api_version,
                               kind=constants.KSERVE_KIND,
                               metadata=client.V1ObjectMeta(
                                   name=name, namespace=namespace, annotations={'sidecar.istio.io/inject': 'false'}),
                               spec=V1beta1InferenceServiceSpec(
                                   predictor=V1beta1PredictorSpec(
                                       xgboost=V1beta1XGBoostSpec(
                                           storage_uri="gs://gcp-bucket-kubeflow/ml-model/artifacts/",
                                       )
                                   )
                               )
)
# Create InferenceService

KServe = KServeClient()
KServe.create(isvc)
# For tracking

KServe.get(name, namespace=namespace, watch=True, timeout_seconds=120)
status = KServe.get(name, namespace=namespace)
print(status)
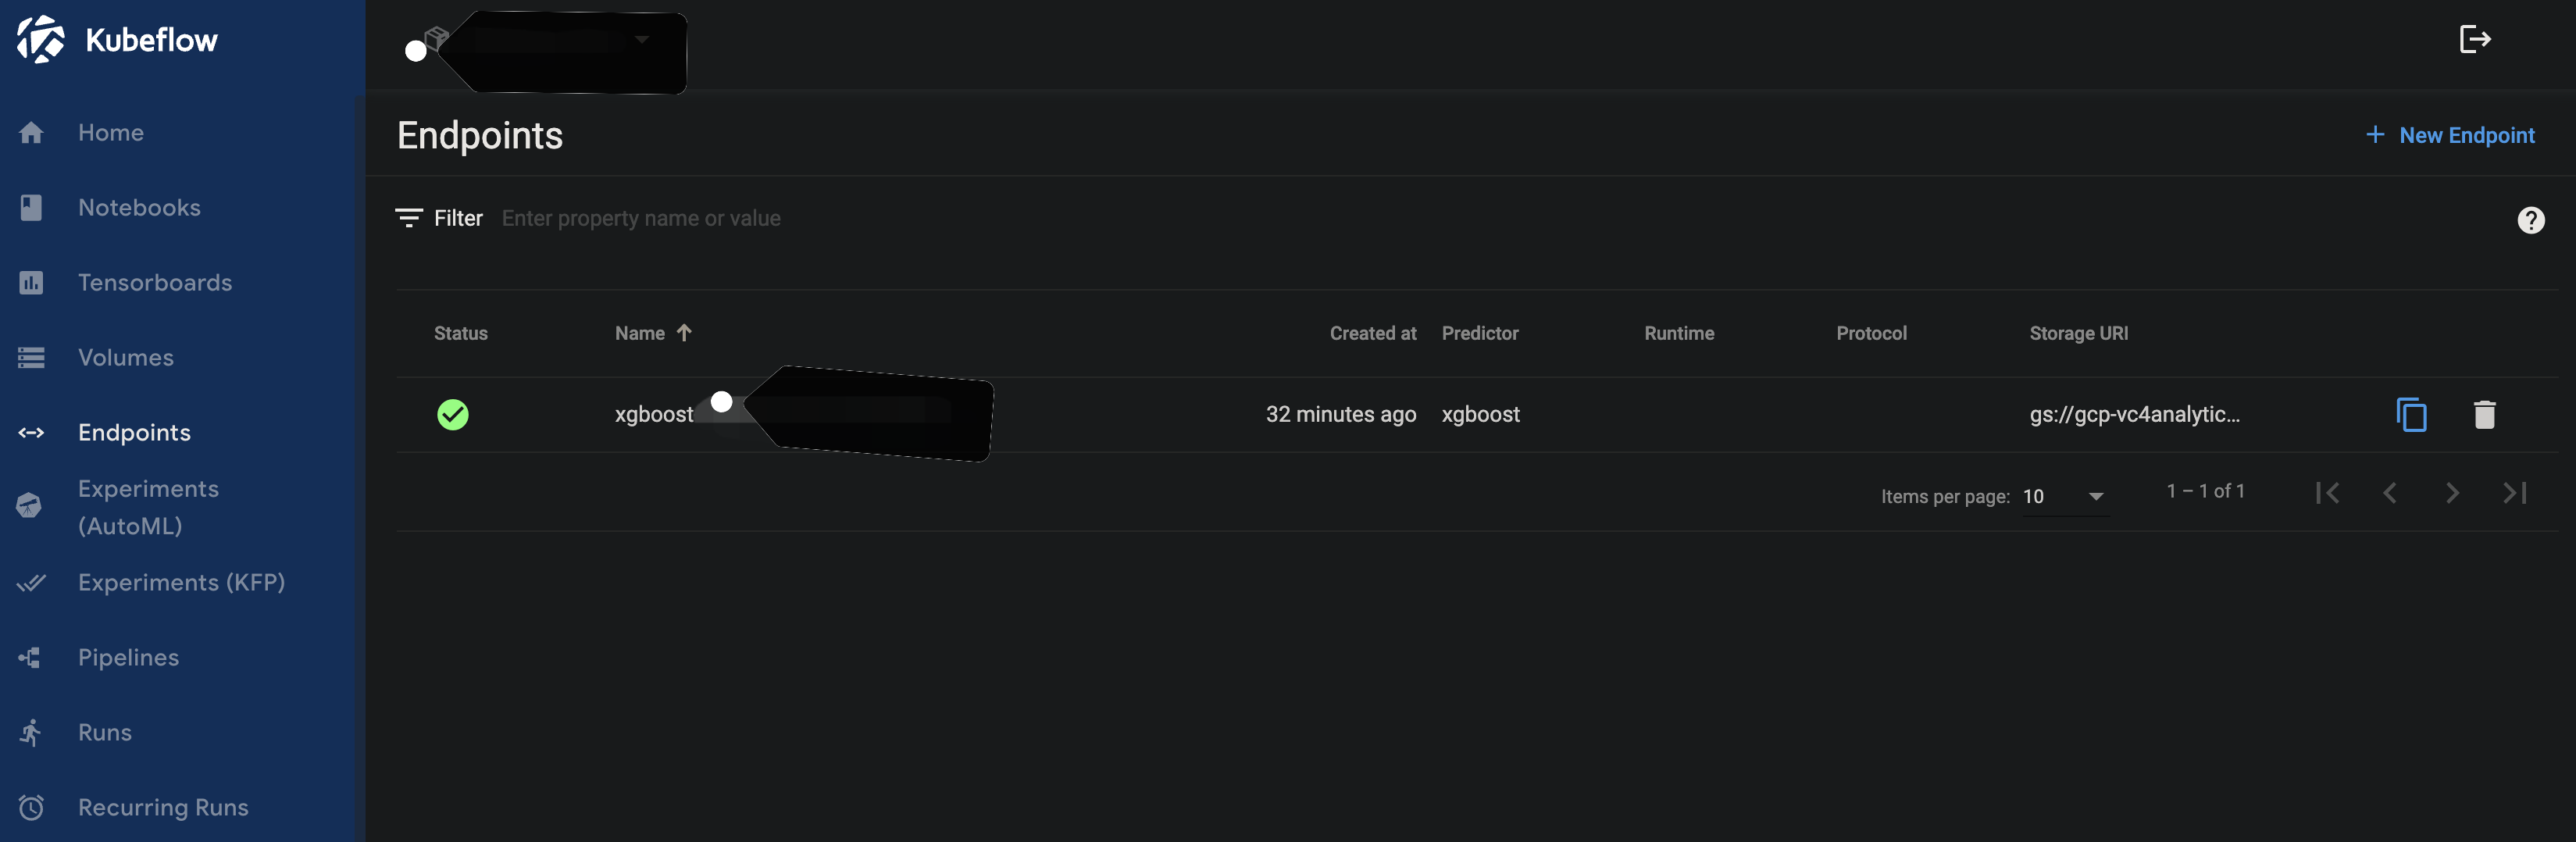
After the above command executed successfully, you can see the endpoint deployed on Kubeflow on the Kubeflow UI under Endpoints
Making predictions with Vertex AI Endpoints
import requests
import json

from google.oauth2 import service_account
from google.auth.transport.requests import Request
from google.cloud import secretmanager
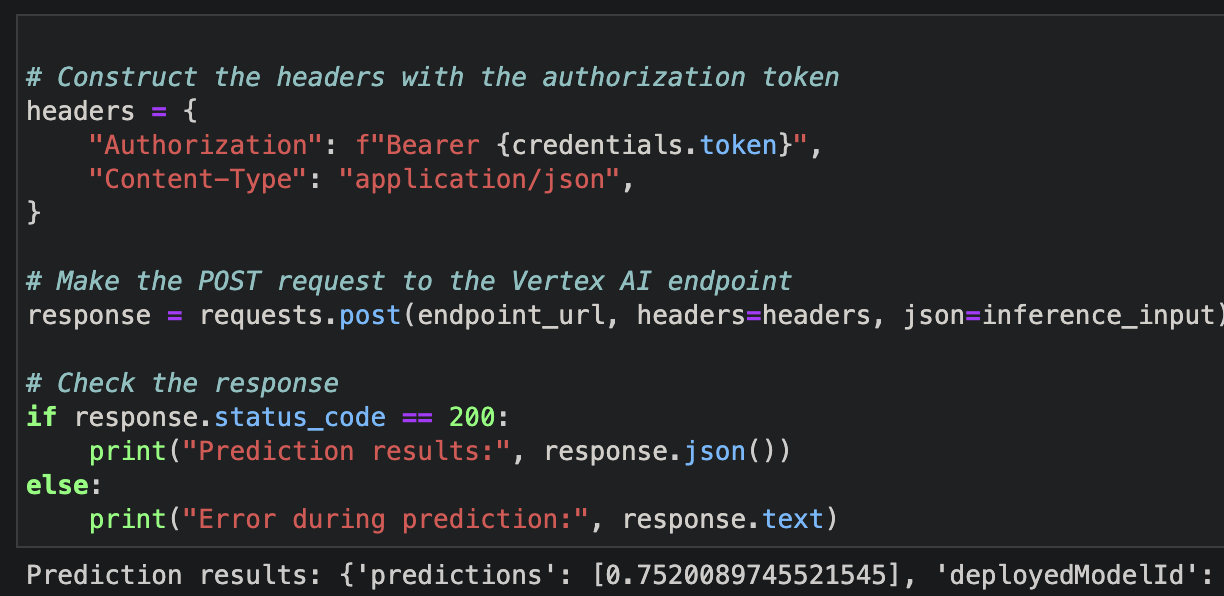
# Construct the headers with the authorization token
headers = {
    "Authorization": f"Bearer {credentials.token}",
    "Content-Type": "application/json",
}

# Make the POST request to the Vertex AI endpoint
response = requests.post(endpoint_url, headers=headers, json=inference_input)

# Check the response
if response.status_code == 200:
    print("Prediction results:", response.json())
else:
    print("Error during prediction:", response.text)
Making predictions with Kubeflow Endpoints
from kubernetes import client
from kserve import KServeClient
from kserve import constants
from kserve import utils
# Get the InferenceService URL
KServe = KServeClient()
name = 'ml-model'
kserve_version = 'v1beta1'
api_version = constants.KSERVE_GROUP + '/' + kserve_version
namespace = utils.get_default_target_namespace()
isvc_resp = KServe.get(name, namespace=namespace)
isvc_url = isvc_resp['status']['address']['url']
input_data = x_test_hashing.iloc[0].to_dict()

inference_input = {
    'instances': [list(input_data.values())]
}

response = requests.post(f"{isvc_url}/v1/models/ml-model:predict", json=inference_input)
print(response.text)
Using MLFlow with Kubeflow
Within the Kubeflow Notebook, you can also use MLFlow to track and manage your machine learning experiments.
In the below example, I am using the wine data to train a XGBoost model and track the experiment with MLFlow.
# Data Pre-processing

white_wine = pd.read_csv("./winequality-white.csv", sep=";")
red_wine = pd.read_csv("./winequality-red.csv", sep=";")


red_wine['is_red'] = 1
white_wine['is_red'] = 0

data = pd.concat([red_wine, white_wine], axis=0)
data.rename(columns=lambda x: x.replace(' ', '_'), inplace=True)
high_quality = (data.quality >= 7).astype(int)
data.quality = high_quality
# Split the data into train, validation, and test sets

X = data.drop(["quality"], axis=1)
y = data.quality

X_train, X_rem, y_train, y_rem = train_test_split(X, y, train_size=0.6, random_state=123)

X_val, X_test, y_val, y_test = train_test_split(X_rem, y_rem, test_size=0.5, random_state=123)
# Define the search space for hyperparameter tuning

search_space = {
  'max_depth': scope.int(hp.quniform('max_depth', 4, 100, 1)),
  'learning_rate': hp.loguniform('learning_rate', -3, 0),
  'reg_alpha': hp.loguniform('reg_alpha', -5, -1),
  'reg_lambda': hp.loguniform('reg_lambda', -6, -1),
  'min_child_weight': hp.loguniform('min_child_weight', -1, 3),
  'objective': 'binary:logistic',
  'seed': 123,
}
mlflow.xgboost.autolog()

def train_model(params):
    with mlflow.start_run(nested=True):
        train = xgb.DMatrix(data=X_train, label=y_train)
        validation = xgb.DMatrix(data=X_val, label=y_val)
        booster = xgb.train(params=params, dtrain=train, num_boost_round=1000,
                            evals=[(validation, "validation")], early_stopping_rounds=50)
        validation_predictions = booster.predict(validation)
        auc_score = roc_auc_score(y_val, validation_predictions)
        mlflow.log_metric('auc', auc_score)

        signature = infer_signature(X_train, booster.predict(train))
        mlflow.xgboost.log_model(booster, "model", signature=signature)

        return {'status': STATUS_OK, 'loss': -1*auc_score, 'booster': booster.attributes()}


# A reasonable value for parallelism is the square root of max_evals.
spark_trials = SparkTrials(parallelism=10)
# Run fmin within an MLflow run context so that each hyperparameter configuration is logged as a child run of a parent

with mlflow.start_run(run_name='xgboost_models'):
    best_params = fmin(
    fn=train_model,
    space=search_space,
    algo=tpe.suggest,
    max_evals=96,
    trials=spark_trials,
    )
# Retrieve the best run and log the AUC of the best run

best_run = mlflow.search_runs(order_by=['metrics.auc DESC']).iloc[0]
print(f'AUC of Best Run: {best_run["metrics.auc"]}')
# Register the best model version with MLflow

new_model_version = mlflow.register_model(f"runs:/{best_run.run_id}/model", model_name)

print(new_model_version)
# Promote the new model version to Production
client.set_registered_model_alias(
  name=model_name,
  version=new_model_version.version,
  alias="Production"
)

# Transition the new model version to the Production stage
client.transition_model_version_stage(
  name=model_name,
  version=new_model_version.version,
  stage="Production",
)
# Load the best model using alias set above and evaluate it on the test set
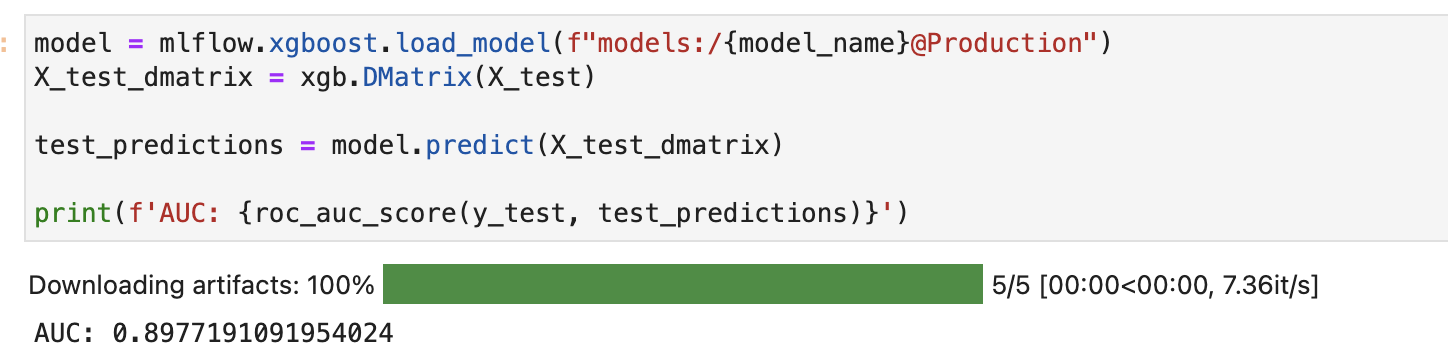
model = mlflow.xgboost.load_model(f"models:/{model_name}@Production")
X_test_dmatrix = xgb.DMatrix(X_test)
test_predictions = model.predict(X_test_dmatrix)
print(f'AUC: {roc_auc_score(y_test, test_predictions)}')
# Make predictions with the model

prediction = model.predict(xgb.DMatrix(X_test.iloc[:3]))
print(f"Prediction: {prediction}")
print(f"Prediction list: {prediction.tolist()}")

And that’s it, now you have a running kubeflow application for your MLOps workload with MLFlow integration.
Thank you for reading and have a nice day!