

Airflow is a powerful orchestration tool for scheduling and orchestrating workflows. It is a great tool for data engineers to manage data pipelines. There are a lot of explanations in the internet about the benefit of using Apache Airflow, this link is an example.
In this article I will focus on discussing the process of deploy Apache Airflow to Kubernetes cluster by using Helm. We then will configure it to have all of the logs stored in Google Cloud Storage. Furthermore, we will use the Git-Sync feature to automatically sync DAGs codes from GitHub to Apache Airflow.
Prerequisites
1 - Install Helm and Kind (optional)
brew install helm
brew install kind
2 - Have a Kubernetes cluster running
If you already have a Kubernetes cluster running, you can skip this step. Otherwise, you can follow the below step to use Kind to create a Kubernetes cluster locally, or set up a Kubernetes cluster in Google Cloud Platform.
For the content in this post, for demo purposes, I will use kind, and mount all of our pods back to GCP so that it runs like on GKE.
Create a Kubernetes cluster using Kind
We will need a kind-cluster.yaml to create the cluster. The file looks something as below:
kind: Cluster
apiVersion: kind.x-k8s.io/v1alpha4
nodes:
- role: control-plane
- role: worker
  kubeadmConfigPatches:
  - |
    kind: JoinConfiguration
    nodeRegistration:
      kubeletExtraArgs:
        node-labels: "node=worker_1"
  extraMounts:
    - hostPath: ./data
      containerPath: /tmp/data
- role: worker
  kubeadmConfigPatches:
  - |
    kind: JoinConfiguration
    nodeRegistration:
      kubeletExtraArgs:
        node-labels: "node=worker_2"
  extraMounts:
    - hostPath: ./data
      containerPath: /tmp/data
- role: worker
  kubeadmConfigPatches:
  - |
    kind: JoinConfiguration
    nodeRegistration:
      kubeletExtraArgs:
        node-labels: "node=worker_3"
  extraMounts:
    - hostPath: ./data
      containerPath: /tmp/data
kind create cluster --name airflow-cluster --config kind-cluster.yaml
Setting up GKE
gcloud container clusters create airflow-cluster \
--machine-type n1-standard-4 \
--num-nodes 1 \
--region "us-central1"
Install Apache Airflow
First, we will create a namespace for Apache Airflow and switch to the context we just set up if you have multiple Kubernetes clusters running.
k create ns airflow

k get ns

k config use-context kind-airflow-cluster
Then, we will add the Apache Airflow Helm repository and install Apache Airflow using Helm.
helm repo add apache-airflow https://airflow.apache.org

helm repo update

helm install airflow apache-airflow/airflow --namespace airflow --debug --timeout 100m0s

helm ls -n airflow
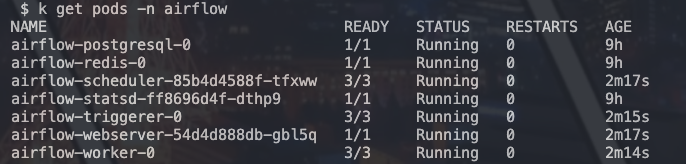
After installing, we will be able see the running pods.
# to check logs of pods
k logs -n airflow airflow-scheduler-85b4d4588f-tfxww -c scheduler
Getting the values.yaml file
helm show values apache-airflow/airflow > values.yaml
Configure Apache Airflow
1 - Configure env variables
To add a env var, on values.yaml modify the part extraEnvFrom
extraEnvFrom: |
  - configMapRef:
      name: 'airflow-variables'
Then on the same level of the values.yaml, we will need a variables.yaml, it will look something as below:
apiVersion: v1
kind: ConfigMap
metadata:
  namespace: airflow
  name: airflow-variables
data:
  AIRFLOW_VAR_GCP_BUCKET: "gcs-airflow"
  AIRFLOW_VAR_GCP_PROJECT_ID: "gcp-prj-id""
After saving the varaibles.yaml files, run
k apply -f variables.yaml -n airflow

helm upgrade --install airflow apache-airflow/airflow -n airflow -f values.yaml --debug
To test does the env var added properly
k get configmap airflow-variables -n airflow -o yam
Exec into our pods, it could be any prod, I will use the webserver pod as an example
k exec --stdin --tty -n airflow airflow-webserver-12323-1232 -- /bin/bash
# Method 1
printenv | grep AIRFLOW_VAR
# Method 2 - run python inside the pod
python
from airflow.models import Variable

Variable.get("GCP_BUCKET")
# This should print your env var, note that Variable.get("AIRFLOW_VAR_MY_GCP_BUCKET") won't work
2 - Adding new packages
We will need to have a requirements.txt file, since we want to mount it back to GCP with different services, it will look something as below:
airflow-provider-great-expectations==0.2.7
apache-airflow-providers-google==10.13.1
requests==2.31.0
lxml==4.9.4
cssselect==1.2.0
discord-webhook==1.3.0
discord==2.3.2
pydantic==1.10.4
pandas==2.0.0
fsspec==2023.12.2
gcsfs==2023.12.2.post1
db-dtypes==1.2.0
Then we will need a Dockerfile, remember to make sure the airlfow version that we use in the Dockerfile has to match the airflow version as helm installation
To findout our airflow version, we can use the below command
helm list -n airflow
or find it on the values.yaml which we obtain via
helm show values apache-airflow/airflow > values.yaml
Our Dockerfile will look something as below:
FROM apache/airflow:2.8.3

COPY requirements.txt .

RUN pip install -r requirements.txt
docker build -t airflow-custom .

kind load docker-image airflow-custom:latest --name airflow-cluster
Modify the values.yaml file as below
defaultAirflowRepository: airflow-custom # name of docker image

# Docer images version - Default airflow tag to deploy
defaultAirflowTag: "latest"
Apply the changes
helm upgrade --install airflow apache-airflow/airflow -n airflow -f values.yaml --debug

# To verify
k exec -n airflow airflow-webserver-122343-1232 -- airflow info
Not all of the pod will be restarted, depending on the changes made on the values.yaml file, you might need to rollout restart the pods manually. Depending on your need, the below command will also trigger a restart of all pods in the namespace.
k delete pods --all -n airflow
3 - Add GCP Config
First oo all, we will need to create a service account with sufficient roles and export the credentials as a json file. Then we will need to create a secret in Kubernetes to store the credentials.
kubectl create secret generic gcp-sc-key --from-file=gcp-key.json=/path/to/your/creds.json -n airflow
The we will have to modify the values.yaml file as below:
env:
  - name: GOOGLE_APPLICATION_CREDENTIALS
    value: "/opt/airflow/secrets/gcp-key.json"

# Volumes for all airflow containers
volumes:
  - name: gcp-service-account-volume
    secret:
      secretName: gcp-sc-key

# VolumeMounts for all airflow containers
volumeMounts:
  - name: gcp-service-account-volume
    mountPath: /opt/airflow/secrets
Modify config to have the logs save into GCS bucket in values.yaml
config:
    logging:
    remote_logging: 'True'
    remote_base_log_folder: 'gs://gcs-airflow/logs/'
    remote_log_conn_id: 'gcp-sc-key'
    google_key_path:  "/opt/airflow/secrets/gcp-key.json"
Modify the rest of the services in values.yaml
# Airflow scheduler settings
scheduler:
  extraVolumeMounts:
    - name: google-cloud-key
      mountPath: /opt/airflow/secrets
  extraVolumes:
    - name: google-cloud-key
      secret:
        secretName: gcp-sc-key

# Airflow webserver settings
webserver:
  extraVolumeMounts:
    - name: google-cloud-key
      mountPath: /opt/airflow/secrets
  extraVolumes:
    - name: google-cloud-key
      secret:
        secretName: gcp-sc-key

# Airflow triggerer settings
triggerer:
  extraVolumeMounts:
    - name: google-cloud-key
      mountPath: /opt/airflow/secrets
  extraVolumes:
    - name: google-cloud-key
      secret:
        secretName: gcp-sc-key
After modifying everything in values.yaml, apply the changes
helm upgrade --install airflow apache-airflow/airflow -n airflow -f values.yaml --debug
After running applying the changes successfully, we will start to see logs going into our GCP bucket.

We can also test it out by exec into a pod
k get pods -n airflow

k exec --stdin --tty -n airflow airflow-webserver-12344234-234324 -- /bin/bash
After exec into the pod, run the below command to verify
# to check whether the secrets folder is there
ls

cd ls # to check is that the gcp secret we added
Then let’s try connecting to GCP’s service
from google.cloud import secretmanager
from os import getenv

GOOGLE_APPLICATION_CREDENTIALS = getenv("GOOGLE_APPLICATION_CREDENTIALS")

client = secretmanager.SecretManagerServiceClient()
or
from os import getenv
from google.cloud import bigquery
from google.oauth2 import service_account

GOOGLE_APPLICATION_CREDENTIALS = getenv("GOOGLE_APPLICATION_CREDENTIALS")

credentials = service_account.Credentials.from_service_account_file(GOOGLE_APPLICATION_CREDENTIALS, scopes=["https://www.googleapis.com/auth/cloud-platform"],)
client = bigquery.Client(credentials=credentials, project=credentials.project_id)
4 - Git sync for DAGS
First of all, we will need to have a ssh key, we can follow the step here
ssh-keygen -t ed25519 -C "email@email.com"

eval "$(ssh-agent -s)"

open ~/.ssh/config

ssh-add --apple-use-keychain ~/.ssh/id_ed25519

# Copy the key
pbcopy < ~/.ssh/id_ed25519.pub
After adding the ssh key on the repo, we will also need to add ssh key to k8s cluster
k create secret generic ssh-git-secret --from-file=gitSshKey=/path/to/.ssh/id_ed25519 -n airflow

# To verify
echo ~/.ssh/id_ed25519
Then we will need to modify the values.yaml file as below:
gitSync:
    enabled: true
    repo: ssh://git@github.com/gituhub/airflow-dags.git
    branch: main

....

sshKeySecret: ssh-git-secret # from the above command
Add a demo DAG to the repo.
from datetime import datetime, timedelta
from textwrap import dedent
# The DAG object; we'll need this to instantiate a DAG
from airflow import DAG
# Operators; we need this to operate!
from airflow.operators.bash import BashOperator
with DAG(
'airflow_test_dag',
# These args will get passed on to each operator
# You can override them on a per-task basis during operator initialization
default_args={
'depends_on_past': False,
'email': ['airflow@example.com'],
'email_on_failure': False,
'email_on_retry': False,
'retries': 1,
'retry_delay': timedelta(minutes=5),
},
description='A simple tutorial DAG',
schedule_interval=timedelta(days=1),
start_date=datetime(2021, 1, 4),
catchup=False,
tags=['example'],
) as dag:
# t1, t2 and t3 are examples of tasks created by instantiating operators
t1 = BashOperator(
task_id='print_date',
bash_command='date',
)
t2 = BashOperator(
task_id='sleep',
depends_on_past=False,
bash_command='sleep 5',
retries=3,
)
t1.doc_md = dedent(
"""\
#### Task Documentation
You can document your task using the attributes `doc_md` (markdown),
`doc` (plain text), `doc_rst`, `doc_json`, `doc_yaml` which gets
rendered in the UI's Task Instance Details page.

"""
)
dag.doc_md = __doc__ # providing that you have a docstring at the beginning of the DAG
dag.doc_md = """
This is a documentation placed anywhere
""" # otherwise, type it like this
templated_command = dedent(
"""
{% for i in range(5) %}
echo "{{ ds }}"
echo "{{ macros.ds_add(ds, 7)}}"
{% endfor %}
"""
)
t3 = BashOperator(
task_id='templated',
depends_on_past=False,
bash_command=templated_command,
)
t1 >> [t2, t3]
Update helm
helm upgrade --install airflow apache-airflow/airflow -n airflow -f values.yaml --debug
It will take a few minutes for the DAG to be synced, we can check on the airflow web UI to verify whether the DAG is synced.
5 - Airflow Web UI
Finally, we can verify everything on the Airflow Web UI
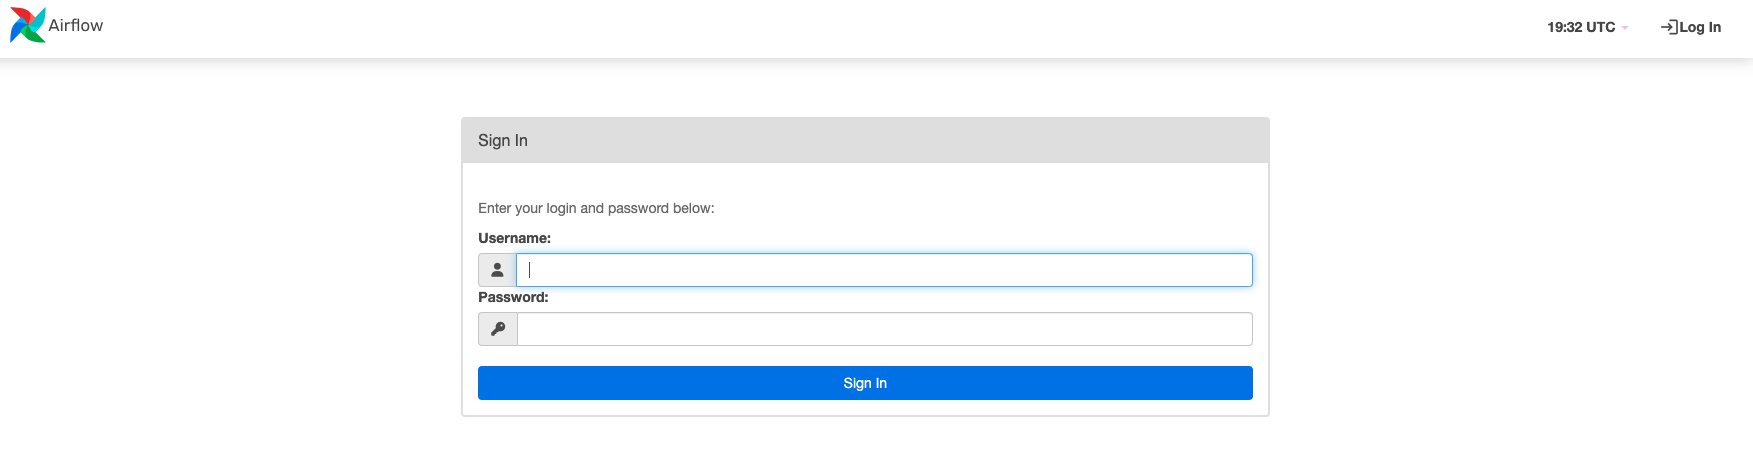
k port-forward svc/airflow-webserver 8080:8080 -n airflow
Then in browser, go to localhost:8080 to access the Airflow Web UI
And that’s it! We now have a fully functional Apache Airflow running on Kubernetes cluster, we all of the pods mounted back to GCP. We also have the Git-Sync feature enabled to automatically sync DAGs from GitHub to Apache Airflow.
In our next blog post, we will deep dive into DAG implementation.
Thank you for reading and have a nice day!